To paint a 3D printed miniature, follow five core steps: wash and prep the model, prime it, lay thin base coats, apply a wash for shadows, then dry-brush highlights and seal with varnish. Use thinned acrylic paints, build colour in multiple thin coats, and always let each layer dry fully.
Whether your fighter rolled off a resin printer or an FDM machine, the painting workflow is nearly identical once the surface is prepped. The difference is in that prep stage, and it is the part most new D&D painters underestimate. This guide walks you through the whole process so your first mini looks like a tabletop hero instead of a primer-grey blob.
What do you need before you start painting?
You do not need a hobby store’s worth of gear to paint your first miniature. A handful of brushes, a primer, a small palette of acrylics, a wash, and a varnish will carry you through dozens of models. Quality matters more on brushes and primer than on the paint range you choose.
For paint, beginner-friendly acrylic ranges like Citadel, Vallejo, and Army Painter are all designed for miniatures. Citadel paints tend to be thicker out of the pot, while Vallejo and Army Painter come pre-thinned in dropper bottles, which many beginners find easier to control. There is no wrong choice; a final matte varnish evens out mixed brands anyway.
How do you prep an FDM vs resin miniature?
Surface prep is where FDM and resin minis diverge. Both must be cleaned first, but resin takes primer evenly and holds paint cleanly, so it needs less smoothing work. FDM prints carry visible layer lines and usually need sanding, filler primer, or gesso to even out the surface before priming.
| Step | Resin miniature | FDM miniature |
|---|---|---|
| Cleaning | Wash in isopropyl alcohol or soap & water as normal post-processing | Soap & water to remove residue and oils |
| Surface smoothing | Minimal — surface is already smooth | Sanding, filler primer, or gesso to reduce layer lines |
| Priming ease | Takes primer evenly, fine detail stays crisp | Even, but extra filler coats may soften fine detail |
| Prep time | Short | Longer — more steps before paint |
| Best for | Highly detailed heroes & display pieces | Larger models, terrain, durable gaming pieces |
What are the steps to paint a 3D printed miniature?
Here is the beginner workflow, in order. The single most important habit is thinning your paints to a milk-like consistency and building colour in two or more thin coats rather than one thick one. Thick paint hides the crisp detail that makes a mini look good.
Step 1 — Clean the model
Wash the miniature in soap and water (or isopropyl alcohol for resin) to remove mould-release residue, oils, and printing dust. Let it dry fully. Paint will not stick reliably to a dirty surface.
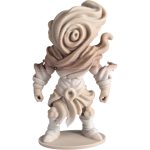
Step 2 — Prime it
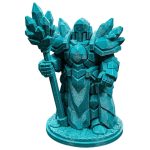
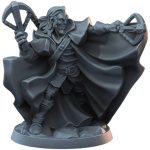
Apply a primer designed for plastics in several thin coats, keeping the can moving so primer does not pool and clog detail. Grey is the most forgiving colour for beginners, black makes shadows deeper, and white makes colours pop brighter. Let it cure before painting.
Step 3 — Lay your base coats
Thin each paint to about a milk consistency and apply two thin coats, letting each dry between passes. Block in the main colours — skin, armour, cloth, weapon — without worrying about shading yet. Thin coats preserve detail and prevent runs.
Step 4 — Apply a wash for shadows
Brush a dark wash (a pre-thinned shade paint) over the model or into the recesses. It flows into cracks and crevices, settling as shadow and instantly adding depth. This single step does the most visual heavy lifting for beginners.
Step 5 — Dry-brush the highlights
Load a little light paint on a dry brush, wipe most of it off on a paper towel, then drag the brush lightly across raised edges. The faint paint catches only the high points, creating highlights that pop the texture. Do this before varnishing, never after.
Step 6 — Seal with varnish
Once everything is dry, protect your work with a varnish. Matte improves readability and hides brush marks; add a touch of gloss on gems, eyes, or blood effects. Sealing keeps tabletop handling from chipping your paint.
How long does it take and what does the time break down to?
A first table-ready mini is an afternoon project once prep is done, with drying time being the main wait. Roughly, your active effort splits across the stages like this — useful for planning a painting session around drying breaks.
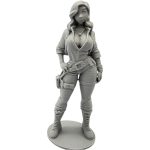
Where does 3DCentral fit in?
You can only paint a great mini if you start with a great print. 3DCentral runs a 200+ printer farm in Quebec, producing both original 3DCentral designs and curated community-artist models. Our custom D&D miniature service is AI-assisted and human and artist-finished — you describe your character, our dual AI engine (Tripo + Rodin) drafts it, and you get a preview-approval before anything prints.
For Canadian players the practical wins matter: pricing in CAD, no customs surprises, real domestic shipping speed, and support in English and real Quebec French. You receive a clean, paint-ready print instead of a grey-market Mystery Box.
Note: custom and community-artist designs are not covered by 3DCentral’s Commercial License, which applies to original 3DCentral designs only — for commercial rights to a community artist’s model, contact the artist directly.
Ready to paint your own hero? Start by getting a clean, detailed, paint-ready figure made for your character with our custom D&D miniature service.
Sources: 3D Printerly, The Printing Goes Ever On, Age of Miniatures.
Frequently asked questions
Do you have to prime a 3D printed miniature before painting?
Yes. Priming gives acrylic paint a surface it can grip, prevents patchy coverage, and brings out detail. Always clean the model first, then apply primer in several thin coats. Grey primer is the most forgiving choice for beginners.
What paint should a beginner use on 3D printed miniatures?
Acrylic miniature paints from Citadel, Vallejo, or Army Painter all work well. Citadel paints are thicker out of the pot; Vallejo and Army Painter come pre-thinned in dropper bottles, which beginners often find easier to control. Thin any of them to a milk consistency before painting.
Is it harder to paint FDM or resin miniatures?
Resin is easier to paint because its smooth surface takes primer evenly and holds fine detail. FDM prints have visible layer lines and usually need extra sanding, filler primer, or gesso before priming. Once the surface is prepped, the painting steps are the same for both.
Do you wash or dry-brush a miniature first?
Wash first, dry-brush second. The wash flows into recesses to create shadows, then dry-brushing catches the raised edges to add highlights. Both should be done before sealing the model with varnish.
How do you seal a painted 3D printed miniature?
After all paint is fully dry, apply a varnish. Matte varnish improves readability and hides brush marks, while a touch of gloss works well on gems, eyes, and blood effects. Sealing protects the paint from chipping during tabletop play.