Quality control is the invisible line that separates professional 3D print operations from hobbyist output. Customers never see your production process. They see the product in their hands. If that product has visible layer lines, rough surfaces, binding joints, or dimensional inaccuracies, no amount of marketing or branding can overcome the impression of poor craftsmanship. At 3DCentral, our Laval, Quebec facility inspects every single product before it enters a shipping box. This is the inspection framework we use, refined over thousands of production hours and tens of thousands of inspected pieces.
This checklist is designed for print farm operators at any scale. The principles apply whether you inspect 20 pieces per day or 200.
Stage 1: Visual Inspection Under Controlled Lighting
Visual inspection is the first and most important quality gate. It catches the widest range of defect types and establishes the baseline assessment for each piece. The key requirement is controlled, consistent lighting.
Lighting Setup
Standard shop lighting or overhead fluorescents are inadequate for quality inspection. Surface defects that are invisible under diffuse overhead light become obvious under directional LED panel lighting with a high color rendering index. A CRI of 90 or above is ideal. The inspection station should have adjustable LED panels that can be positioned to create oblique lighting angles that highlight surface irregularities through shadow contrast.
At 3DCentral, our inspection stations use dual LED panels at approximately 45-degree angles with adjustable brightness. This setup reveals layer inconsistencies, surface artifacts, and finish variations that flat lighting conceals. The investment in proper inspection lighting pays for itself immediately through reduced customer complaints and returns.
What to Look For: Layer Consistency
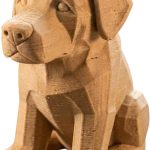
Examine the print for layer line uniformity. Consistent layer lines across the entire surface indicate stable printing conditions: steady temperature, consistent extrusion, and reliable motion control. Inconsistent layers, where some sections appear tighter or looser than others, indicate problems.
Specifically, look for layer banding, which appears as periodic variations in layer height that create a visible stripe pattern. Banding usually indicates a mechanical issue such as a slightly bent lead screw or a loose coupling. Also check for under-extrusion gaps, where individual layers appear thinner or show gaps between adjacent extrusion lines. This indicates either a filament diameter variation, a partial clog, or a temperature dip during the affected layers.
What to Look For: Surface Artifacts
Stringing appears as thin threads of filament stretched between features that should have clean separation. Minor stringing on hidden surfaces may be acceptable depending on your quality standards. Stringing on visible surfaces, particularly across character faces or display-facing surfaces of figurines, is a reject condition.
Blobs and zits are small bumps that appear at points where the print head changes direction or starts and stops extrusion. These are most visible at z-seam locations. While z-seam artifacts are inherent to FDM printing, excessive blob formation indicates retraction settings, pressure advance calibration, or temperature tuning that needs adjustment.
Ghosting or ringing appears as wavy echoes adjacent to sharp features or direction changes. This indicates excessive print speed for the printer’s mechanical rigidity, or insufficiently tuned input shaping. Products with visible ghosting lack the crisp, clean appearance that customers expect.
What to Look For: Detail Resolution
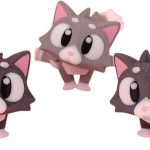
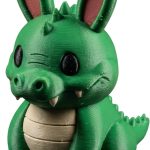
For designs with fine features, including facial expressions on character figurines, text, textures, or small decorative elements, verify that these details are clearly resolved. Under-resolved details appear muddy, filled in, or indistinct. This typically indicates a combination of nozzle size relative to feature size, layer height relative to detail scale, or cooling insufficiency that causes fine features to deform during printing.
At 3DCentral, facial detail quality is one of our most strictly enforced criteria. A duck or gnome with a well-defined, expressive face creates an emotional connection with the collector. One with muddy or indistinct features fails to deliver that connection, regardless of how clean the rest of the print looks.
Stage 2: Dimensional Accuracy Verification
Dimensional accuracy matters for two primary reasons. First, customers expect the product they receive to match the size specifications listed in the product description. Second, dimensional drift in production indicates calibration problems that will worsen if not addressed.
Measurement Protocol
Using digital calipers with 0.01mm resolution, measure critical dimensions against the design’s specification sheet. Priority measurements include overall height, which is the most commonly specified dimension in product listings. Base dimensions verify flatness and correct footprint for display stability. Feature alignment confirms that symmetrical features are actually symmetrical and that multi-part assemblies will fit correctly.
Sampling Strategy
Full dimensional measurement of every piece is impractical at production volume. Instead, implement a sampling strategy that measures a representative percentage while providing adequate statistical coverage. We recommend measuring at least every fifth print from each printer, with additional measurements whenever a printer restarts after maintenance, filament change, or error recovery.
When a dimensional deviation is detected, immediately measure the next several prints from that specific printer. If the deviation is systematic, which is consistent across multiple consecutive prints, pull the printer from production for calibration. If the deviation is isolated to a single print, log it and continue with enhanced monitoring on that machine.
Calibration Drift Detection
Track dimensional measurements over time on a per-printer basis. Plotting measurements chronologically reveals calibration drift that might not be apparent in individual measurements. A printer that produces parts consistently 0.1mm oversize might seem acceptable in isolation, but if last month’s measurements showed nominal accuracy, the trend indicates a developing mechanical issue that will continue to worsen.
Stage 3: Articulation and Functional Testing
For the significant portion of our catalog that includes articulated designs, functional testing is mandatory on every piece. Articulated figurines from designers like Flexi Factory and Cinderwing3D have print-in-place joints that must move freely and smoothly straight off the build plate.
Joint Testing Procedure
Flex each joint through its full range of motion at least twice. On the first flex, note the initial resistance, which should be moderate as joints break free from any minor bridging between articulation surfaces. On the second flex, joints should move smoothly with minimal resistance and no cracking, grinding, or catching.
Evaluate joint looseness. A joint that flops freely without holding position indicates excessive clearance, which usually stems from either the design itself or dimensional inaccuracy in the print. A joint that binds, catches, or cracks indicates insufficient clearance, which stems from over-extrusion, dimensional accuracy problems, or elephant foot on the first layer expanding into the joint gap.
Multi-Joint Consistency
Designs with many joints should show consistent movement quality across all articulation points. If some joints move smoothly while others bind, the binding joints may have experienced different thermal conditions during printing, which is common on large prints where cooling varies across the build area. Log inconsistent joints against the specific printer and print orientation to identify patterns.
Stage 4: Structural Integrity Assessment
A production print must withstand reasonable handling forces. Customers will pick up, reposition, and display their collectibles. A piece that breaks during normal handling is a product failure.
Stress Testing Protocol
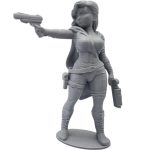
Apply gentle but deliberate pressure to known vulnerability points. For figurines, these include thin features like wands, tails, or antenna. Connection points where the figure meets its base. Protruding elements like outstretched arms, wings, or accessories. The force applied should simulate normal handling: picking up the figurine between thumb and finger, repositioning it on a shelf, removing it from packaging.
If any feature breaks or separates under this gentle handling force, the print has a structural integrity failure. This usually indicates layer adhesion problems caused by under-temperature printing, moisture-contaminated filament, or insufficient cooling that prevents proper interlayer bonding.
Stage 5: Documentation and Data-Driven Quality Management
Inspection without documentation is quality theater. The true value of systematic inspection emerges when you aggregate data over time and use it to drive improvement.
What to Track
For every inspected piece, record the printer ID, design identifier, filament batch, pass or fail result, and for failures, the specific defect category. This data set enables analysis that reveals patterns invisible in individual inspection events.
A printer developing calibration drift will show gradually increasing dimensional deviation in its tracked measurements. A filament spool with moisture issues will show correlated surface quality failures across all printers that used material from that spool. A design with a chronically difficult feature will show elevated failure rates for that specific defect type regardless of printer or material.
At 3DCentral, this data-driven approach has transformed our quality management from reactive troubleshooting to proactive prevention. We identify emerging quality trends before they produce customer-facing defects, and we address root causes rather than symptoms.
For Commercial License subscribers running their own production, implementing even a basic version of this quality tracking system will measurably improve output quality and reduce customer returns.
Frequently Asked Questions
Q: What is the most commonly missed defect in 3D print quality control? A: Subtle layer inconsistency is the most frequently missed defect because it requires proper lighting and trained inspection skills to detect. Under standard shop lighting, moderate layer banding and extrusion inconsistencies can be nearly invisible. Investing in proper high-CRI LED inspection lighting immediately improves defect detection rates.
Q: How long should quality inspection take per piece? A: For a standard figurine without articulation, thorough visual inspection takes 30 to 60 seconds under proper lighting. Articulated pieces with multiple joints require 60 to 120 seconds due to functional testing of each articulation point. These times assume a trained inspector working at a properly equipped inspection station. Rushing inspection to save time always costs more in customer returns than it saves in labor.
Q: Should rejected prints be reworked or recycled? A: At 3DCentral, minor surface defects on non-visible areas may occasionally be addressed through post-processing. However, structural failures, dimensional inaccuracies, and articulation defects are always recycled rather than reworked. Attempting to fix fundamental print quality issues through post-processing usually produces an inferior product that still falls short of quality standards. It is more efficient to recycle and reprint.