Layer height is the single most impactful parameter in FDM 3D printing. It determines the thickness of each horizontal layer deposited by the printer, which directly controls surface smoothness, visible layer lines, print time, structural strength, and detail reproduction. No other single setting has as much influence on the final appearance and production efficiency of a 3D printed object.
Despite its importance, layer height selection is often treated as a binary choice: fine for quality, thick for speed. The reality is far more nuanced. Understanding the physics behind layer height, its interaction with nozzle diameter and print geometry, and the practical tradeoffs involved allows operators to make informed decisions that optimize both quality and productivity for each specific design.
At 3DCentral, every design in our catalog has been assigned a specific layer height based on its geometry, detail requirements, and production constraints. This methodical approach to layer height selection is one of the reasons our figurines and collectibles maintain consistent quality across production runs.
The Physics of Layer Height
Each layer in an FDM print is a flat cross-section of the 3D model. The printer deposits this cross-section as a series of extrusion paths, then moves up by one layer height and deposits the next cross-section. The finished object is a stack of these cross-sections, and the thickness of each section determines how faithfully the stack approximates the original smooth 3D model.
Stair-Stepping Effect
On any curved or angled surface, the stacked layers create a stair-stepping effect. Imagine slicing a sphere into horizontal discs. Thick discs create obvious steps on the sphere’s surface. Thin discs create steps that are so small they appear smooth to the naked eye. This stair-stepping is most visible on surfaces that are nearly horizontal, specifically angles between 10 and 45 degrees from the horizontal plane. Vertical surfaces show minimal stair-stepping regardless of layer height because the layers stack directly on top of each other.
Relationship to Nozzle Diameter
Layer height is constrained by nozzle diameter. The general guideline is that maximum layer height should not exceed 75 to 80 percent of the nozzle diameter. For a standard 0.4mm nozzle, this means a maximum practical layer height of approximately 0.32mm. Going higher risks poor layer adhesion because the nozzle cannot adequately press the deposited material onto the previous layer.
The minimum layer height is determined by the printer’s mechanical resolution, typically the Z-axis stepper motor’s step angle and leadscrew pitch. For most consumer and prosumer printers, practical minimums are 0.04 to 0.08mm, though the benefits of going below 0.08mm are rarely visible on FDM prints.
Fine Layer Heights: 0.08mm to 0.12mm
Ultra-fine layer heights produce the smoothest surfaces achievable with FDM technology. At 0.08mm layer height, individual layers are barely visible even under close inspection, and the surface approaches the smoothness of injection-molded parts.
When Fine Layers Are Worth It
Fine layers are justified for pieces with complex curves, detailed facial features, fine surface textures, or ornamental detail that would be obscured by visible stair-stepping. Small figurines viewed at close range, miniatures for tabletop gaming, and premium display pieces with intricate designs all benefit from the enhanced surface quality.
Articulated figurines from designers like Flexi Factory also benefit from finer layers, as the joint tolerances are tighter and the mechanical interaction between moving parts is smoother. The snap-fit connections and articulation mechanisms work more reliably with the tighter dimensional accuracy that fine layers provide.
The Time Cost
The primary trade-off with fine layers is print time. Halving the layer height approximately doubles the number of layers needed for the same object, which approximately doubles the print time. A figurine that prints in 4 hours at 0.20mm layer height might take 7 to 8 hours at 0.12mm and 10 to 12 hours at 0.08mm. For production operations, this time increase directly affects throughput and cost per unit.
At 3DCentral, we reserve 0.12mm layer heights for our premium detail products and use 0.08mm only for exceptional pieces where the surface complexity genuinely demands it. The cost increase is reflected in the pricing of these premium items.
Standard Layer Heights: 0.16mm to 0.20mm
The 0.16mm to 0.20mm range represents the sweet spot for most decorative collectibles and figurines. Layer lines are visible only on close inspection, surface quality is more than adequate for display pieces viewed at arm’s length, and print times remain practical for production volumes.
The Production Sweet Spot
At 0.16mm, a detailed figurine might print in 4 to 5 hours, a balance that allows multiple production cycles per day per printer. The visual quality satisfies the expectations of collectors purchasing display pieces, while the production efficiency keeps pricing accessible.
At 0.20mm, the same figurine might print in 3 to 4 hours. The slight increase in visible layer lines is acceptable for many designs, particularly those with organic shapes, textured surfaces, or patterns that naturally mask the stair-stepping effect. Designs with lots of straight vertical surfaces and sharp edges tend to look better at 0.16mm, while organic sculpts with flowing curves can often print at 0.20mm without noticeable quality loss.
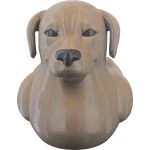
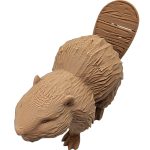
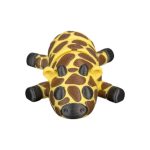
At 3DCentral, 0.16mm is our standard production layer height for the majority of ducks, gnomes, and figurines. It represents the result of extensive testing across thousands of designs and hundreds of thousands of prints.
Variable Layer Height
Modern slicers support variable layer height, automatically adjusting the layer thickness based on the geometry at each height. Sections with gentle curves print at finer layers for smooth surfaces, while vertical sections print at thicker layers for speed. This adaptive approach can reduce print times by 20 to 30 percent compared to uniformly fine layers while maintaining smooth surface quality where it matters most.
Draft Layer Heights: 0.24mm to 0.32mm
Thick layer heights prioritize speed over surface quality. Visible stair-stepping is prominent on curved surfaces, and fine details are obscured by the coarse resolution. These settings serve specific purposes where surface aesthetics are secondary.
Prototyping and Testing
Draft layers are ideal for prototype prints where form, fit, and function are being evaluated before committing to a production-quality print. Printing a prototype at 0.28mm in 2 hours rather than at 0.16mm in 5 hours allows faster design iteration. The surface quality is irrelevant because the prototype will never reach a customer.
Items for Post-Processing
Objects destined for painting, coating, or other surface finishing benefit from the speed of draft layers. A coat of filler primer followed by sanding and paint completely hides the layer lines, making the extra time spent on fine layers during printing unnecessary. Large display pieces that will be painted can print at 0.28mm or 0.32mm and still achieve professional results after finishing.
Functional and Structural Parts
Parts where mechanical function matters more than appearance, such as wall hooks, cable organizers, storage bins, and structural brackets, print well at draft layer heights. The thicker layers actually produce stronger parts due to better inter-layer bonding from the greater material volume at each layer.
Layer Height and Part Strength
The relationship between layer height and mechanical strength is not straightforward. Thinner layers generally produce better layer adhesion because the hot nozzle passes closer to the previous layer, providing more thermal energy for bonding. However, thinner layers also create more potential failure planes (more interfaces between layers), and the reduced material volume per layer can result in weaker individual bonds.
In practice, the sweet spot for strength in PLA prints is typically in the 0.16mm to 0.24mm range. Going finer does not significantly improve strength, and going much thicker can reduce adhesion quality. For production collectibles that must survive packaging, shipping, and handling, the standard 0.16mm to 0.20mm range provides adequate strength without excessive print times.
For print farm operators using designs from our Commercial License library, we include recommended layer height settings with each model to ensure optimal results across both quality and durability.
Frequently Asked Questions
Q: What layer height does 3DCentral use for most collectible figurines? A: Our standard production layer height is 0.16mm for the majority of figurines, ducks, gnomes, and decorative collectibles. This setting produces smooth surfaces with layer lines visible only on close inspection, while maintaining practical production speeds across our fleet of 200-plus printers. Premium detail pieces use 0.12mm, and oversized items may use 0.20mm depending on the design.
Q: Can I see layer lines on 3D printed collectibles at normal viewing distance? A: At our standard 0.16mm layer height, layer lines are essentially invisible at normal display distance of 30 centimeters or more. Under very close inspection or with strong side-lighting, faint horizontal lines may be visible on curved surfaces. Many collectors consider these subtle lines part of the authentic character of 3D printed art, distinguishing it from mass-produced injection-molded items.
Q: Is it better to print slower with thin layers or faster with thick layers? A: It depends on the intended use. For display collectibles, standard layers (0.16-0.20mm) at moderate speeds produce the best balance of quality and efficiency. For prototypes or items that will be painted, thick layers (0.24-0.32mm) at higher speeds save significant time without affecting the final result. Ultra-fine layers (0.08-0.12mm) are reserved for premium pieces where exceptional surface detail justifies the added time and cost.